
Hi everyone,
I have been working on an LCD mounting bracket system for some time (with the blessing of the Big Guys) and am nearing completion of the mechanics of everything. As usual, I'm nit-picking over the details, but they will be finalized this weekend and will be sent to the fabricator on Monday for the final quotation.
The system I have been developing will bolt directly into the existing monitor mounting locations, so no modifications to your game will be necessary. Currently it is a 3 piece system, including top and bottom L-brackets (the top/front piece will allow for the attachment of the fluorescent light in the correct position) and the LCD monitor carriage. The LCD monitor carriage will have both 100mm and 75mm VESA mounting configurations and will be adjustable for depth of monitor and for vertical position, hopefully covering pretty much any available LCD out there.
In addition, an optional fourth piece is being drafted that will allow for a shelf to be added to the monitor carriage for additional accessories such as stereo amps, etc.
If you are interested in adding an LCD to your game and would like a drop-in mounting solution as described above, please contact me (PM or email) or post to this thread. I'll try to answer any questions that I can.
Thank you,
Tony
LCD Mounting Kit - Great Lakes Modular
LCD Mounting Kit - Great Lakes Modular
www.greatlakesmodular.com
Re-Engineered Pinball Parts!
Re-Engineered Pinball Parts!
-
ArcadeBliss
- member
- Posts: 2
- Joined: Thu Jun 11, 2009 7:50 am
Re: LCD Mounting Brackets - Interest/Sign Up
+1 Here. The shelf would not be that important.
Re: LCD Mounting Brackets - Interest/Sign Up
Hi everyone,
Here's the latest update:
Over the weekend I did some extensive reworking of the LCD mount to make shipping (especially for the international crowd) easier. As such, my original 3 piece design got bumped up to 5 pieces (the fluorescent lighting mounts had to be made separate from the LCD mount - no big deal really).
The quotes are all in, so I have a final price on the kit (all hardware included):
$75 + shipping
Shipping costs have not been determined yet as I don't know exactly what the whole kit will weight in at. Worst case is probably around 4 lbs.
I don't yet have an estimated availability date, but as soon as I do, I'll post it.
Thanks,
Tony
www.greatlakesmodular.com
Re-Engineered Pinball Parts!
Re-Engineered Pinball Parts!
-
Miracleman
- member
- Posts: 2
- Joined: Wed Jun 04, 2008 3:49 pm
Re: LCD Mounting Brackets - Interest/Sign Up
I'm in for 1, maybe 2.
I still haven't fully understood if there will eventually be a 'plug and play' kit that will have EVERYTHING, including this bracket, computer case, cpu board, etc.
Or will I have to buy everything in pieces like this?
I would prefer to wait 6 months or whatever, and pay one price at one time for everything, so I only have to tear into my p2k once.
Re: LCD Mounting Brackets - Interest/Sign Up
Count me in for one.

Re: LCD Mounting Brackets - Interest/Sign Up
Thanks for the posts and emails!
The kits have been ordered and at worst case, it will be 4 weeks before they are available. I'm trying to get the order expedited to a 2 week turnaround, but there is no guarantee that they will be done in that time frame.
Miracleman:
Due to the costs that are involved in getting parts like this manufactured, it is unlikely that this particular product will be offered through distributors. But I will certainly post here should that change.
Now comes the hard part. Waiting! Will post updates as I have them.
Tony
www.greatlakesmodular.com
Re-Engineered Pinball Parts!
Re-Engineered Pinball Parts!

Re: LCD Mounting Brackets - Interest/Sign Up
Im in for one!
Re: LCD Mounting Brackets - Interest/Sign Up
Me too. I have an empty cabinet head. Need everything.
Re: LCD Mounting Kit - Great Lakes Modular
Well parts started rolling in early this week but it's taken the whole week to get all of the pieces for the entire package put together!  Much of today has been spent getting pictures of everything so that you'll be able to see not only what you are buying but to also see how easily it all goes together!
There are a pile of pictures, so please be patient while everything loads in...
The following is a picture of the complete kit:
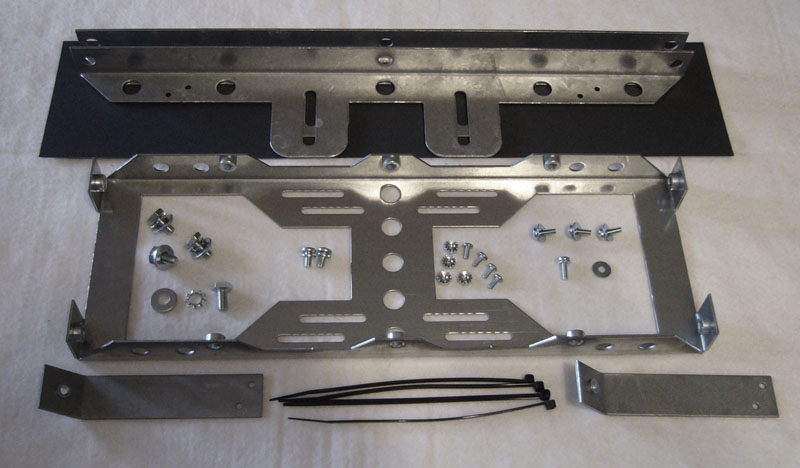
Included in the kit are the following:
1 x LCD Carrier (VESA 100mm and 75mm compliant)
2 x Mounting brackets (upper and lower)
2 x Fluorescent light posts
1 x Black paper strip (bezel light cover)
4 x 1/4-28x1/2 hex head bolts
4 x 1/4 star washers
4 x 1/4 flat washers
4 x M4-.7x12 SEM screws
4 x M4 flat washers
4 x 6-32x5/16 screws
4 x 6-32 K-Lock nuts
2 x 10-32x3/8 SEM screws
4 x 6" black zip ties (for tying up monitor cables, etc.)
--
The kit price is $75 plus shipping.
Due to the weight of the kit (just over 3 lbs), the price for shipping is going to vary from one location to another, so please be sure to send me a zipcode/country with your order/inquiry!
The kit is available now!
As soon as I can, I'll get it added to the GLM website.
--
More pictures will be posted below.
Tony
There are a pile of pictures, so please be patient while everything loads in...
The following is a picture of the complete kit:
Included in the kit are the following:
1 x LCD Carrier (VESA 100mm and 75mm compliant)
2 x Mounting brackets (upper and lower)
2 x Fluorescent light posts
1 x Black paper strip (bezel light cover)
4 x 1/4-28x1/2 hex head bolts
4 x 1/4 star washers
4 x 1/4 flat washers
4 x M4-.7x12 SEM screws
4 x M4 flat washers
4 x 6-32x5/16 screws
4 x 6-32 K-Lock nuts
2 x 10-32x3/8 SEM screws
4 x 6" black zip ties (for tying up monitor cables, etc.)
--
The kit price is $75 plus shipping.
Due to the weight of the kit (just over 3 lbs), the price for shipping is going to vary from one location to another, so please be sure to send me a zipcode/country with your order/inquiry!
The kit is available now!
As soon as I can, I'll get it added to the GLM website.
--
More pictures will be posted below.
Tony
www.greatlakesmodular.com
Re-Engineered Pinball Parts!
Re-Engineered Pinball Parts!
Re: LCD Mounting Kit - Great Lakes Modular
Here are more pictures of the kit. Basically it's an assembly guide if you will so you can see how it should go together and how to install it. It's actually really easy to do and can be done without the need for an assistant.
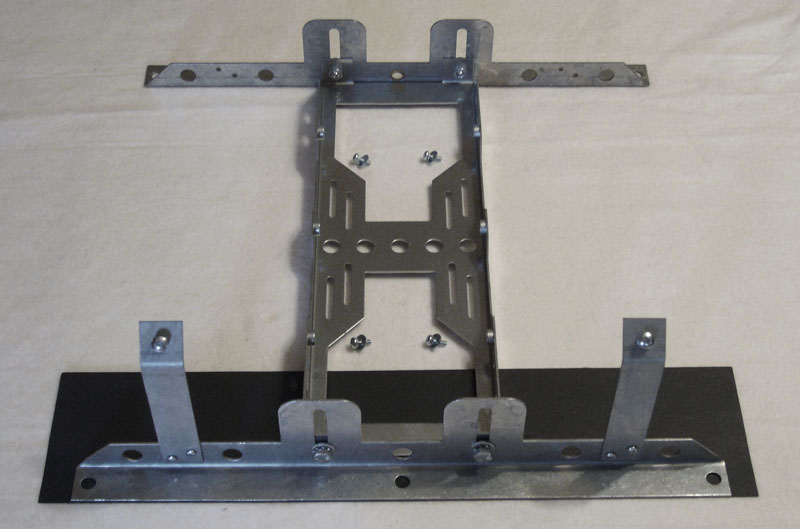
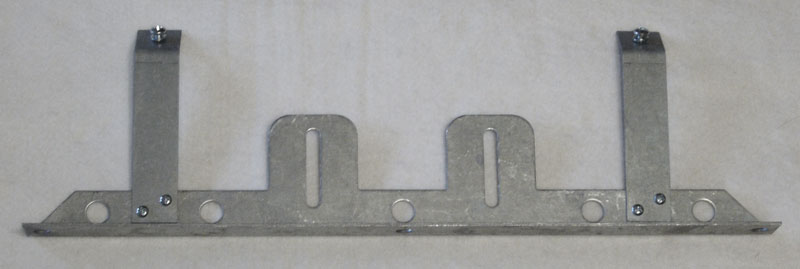
This is the completed frame (without the monitor):
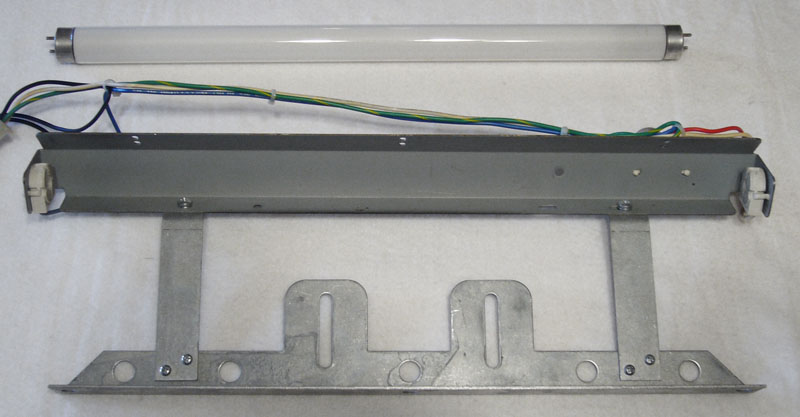
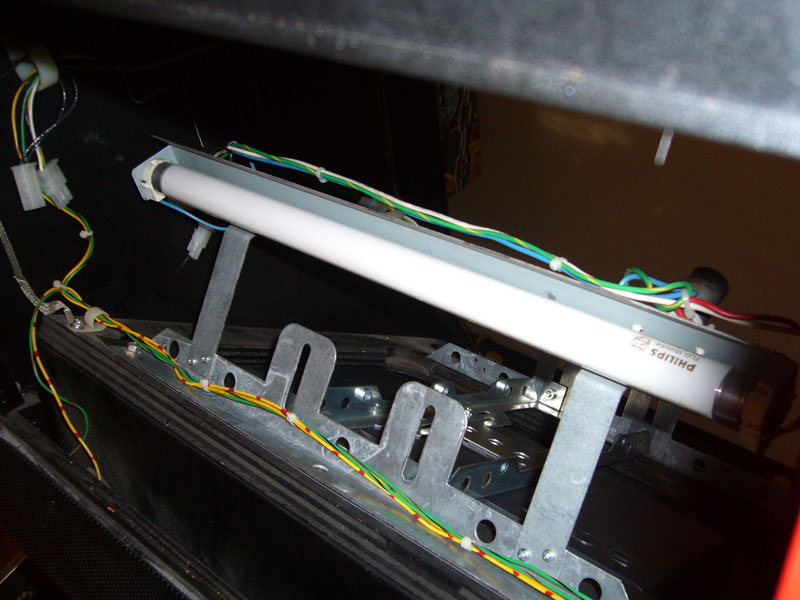
The first step is to assemble the upper support bracket with the fluorescent light:
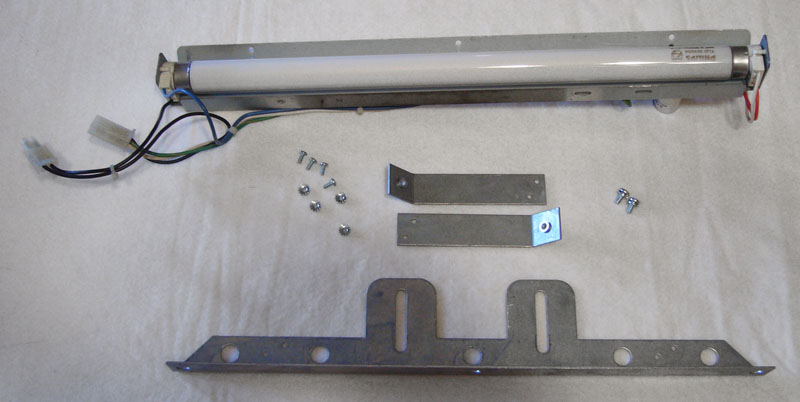
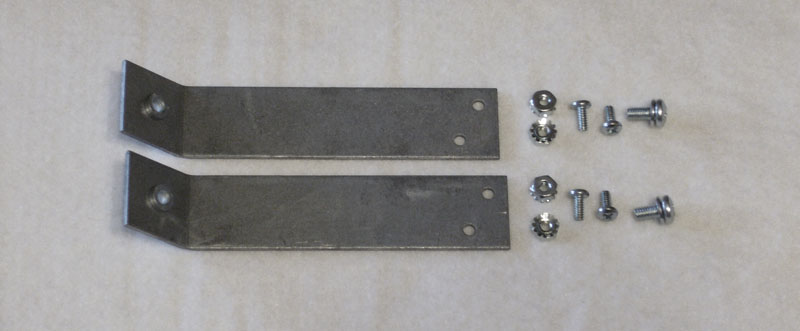
Attach the two light posts to the support bracket:
Attach the fluorescent light bar to the two posts:
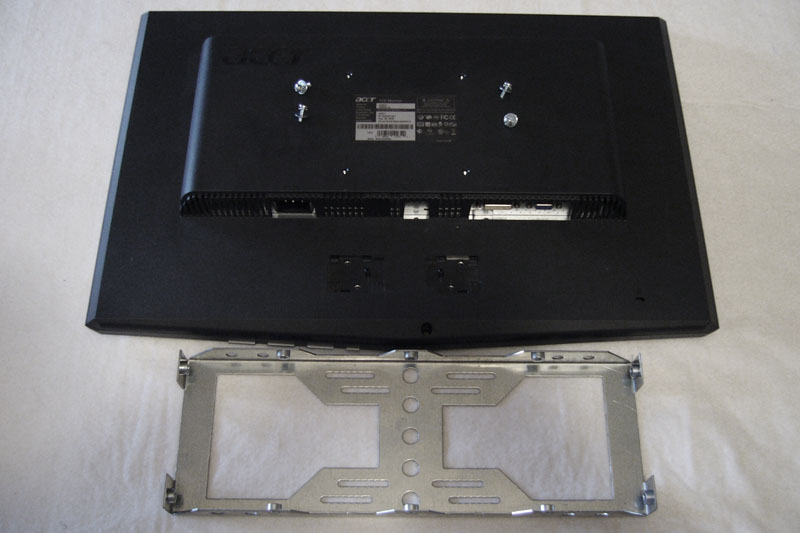
Next attach the LCD carrier frame to the back of the LCD:
(note: You will need to remove the desktop stand (and optionally disable or black out any front panel status LEDs) from the LCD)
Note that the LCD is mounted all the way forward on the carrier.
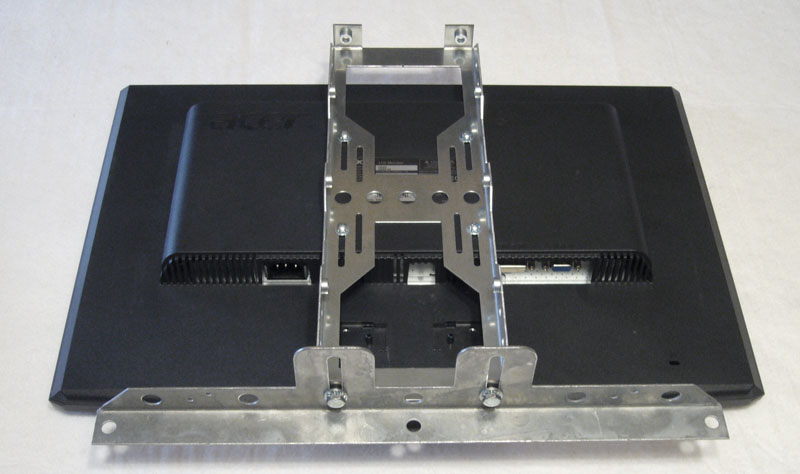
Now attach the lower support bracket to the carrier:
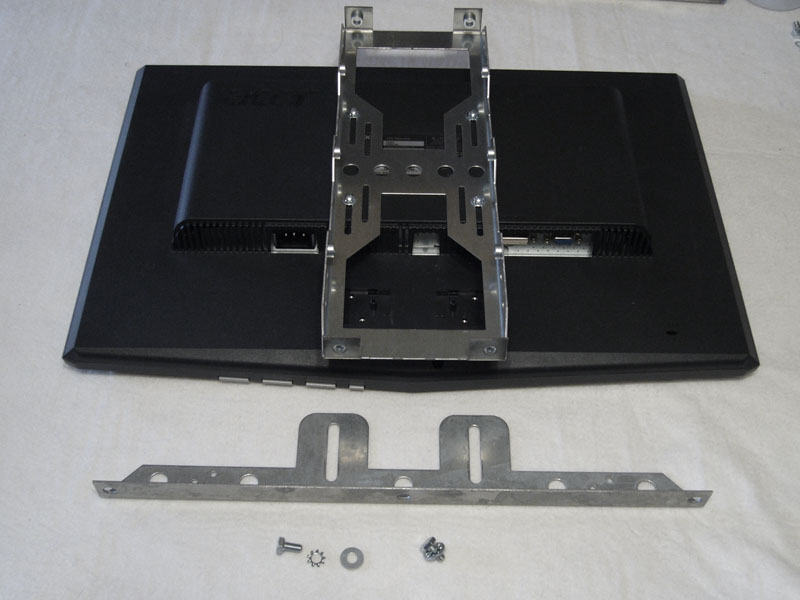
Note that the carrier is mounted to the support bracket as low as possible.
Flip the LCD around so that the support bracket faces towards the head:
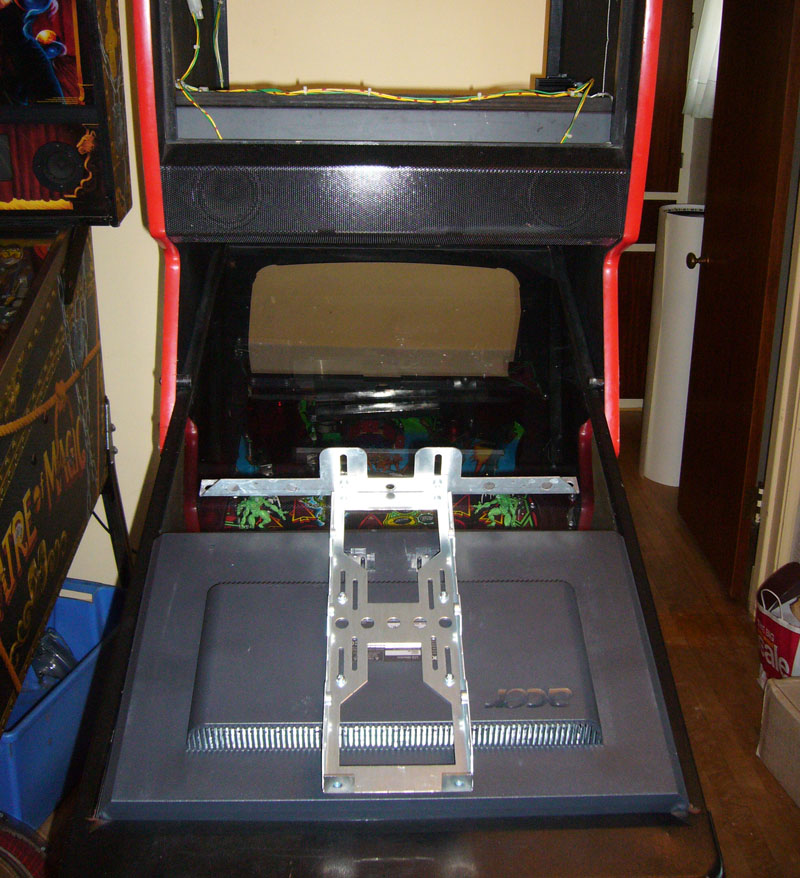
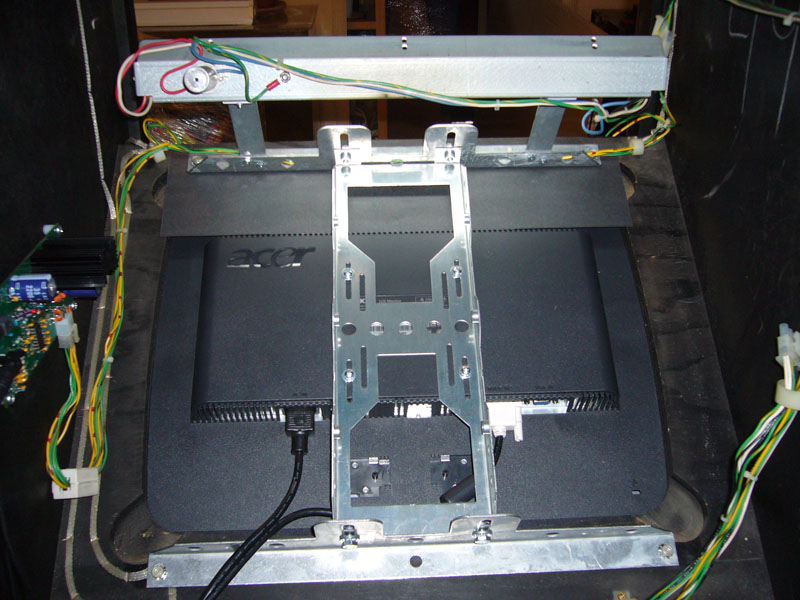
Pull the support bracket up into the head so that it's resting on the bottom edge of the monitor opening:
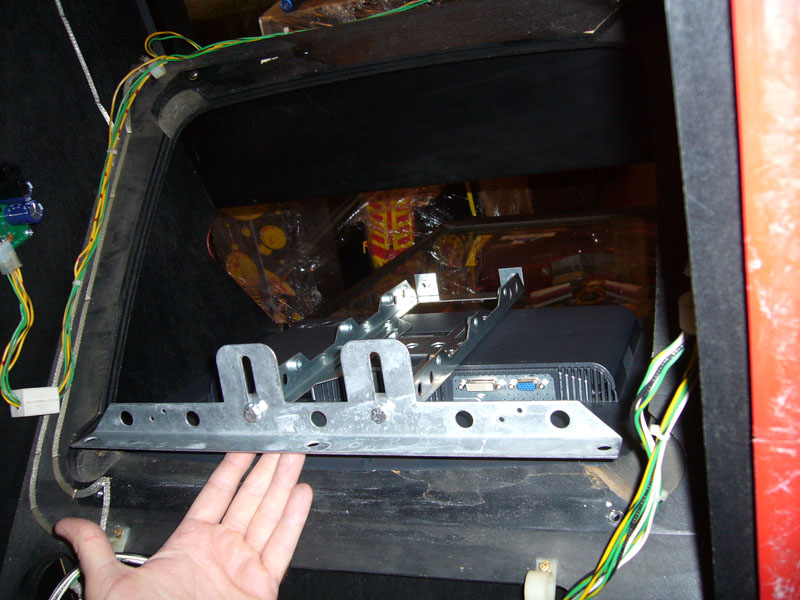
Pull the whole LCD up into the head and rest the top part of the carrier on the top edge of the opening and attach the lower support bracket to the head with two of the original monitor mounting screws:
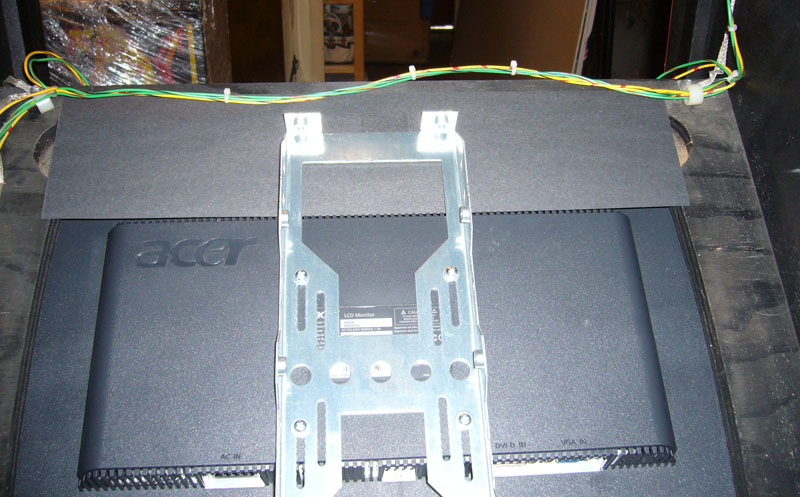
Place the black paper strip under the carrier at the top and center it horizontally so that the paper covers any open gap at the top of the opening. You'll need to punch a couple of holes in the paper so you can feed the upper mounting screws through:
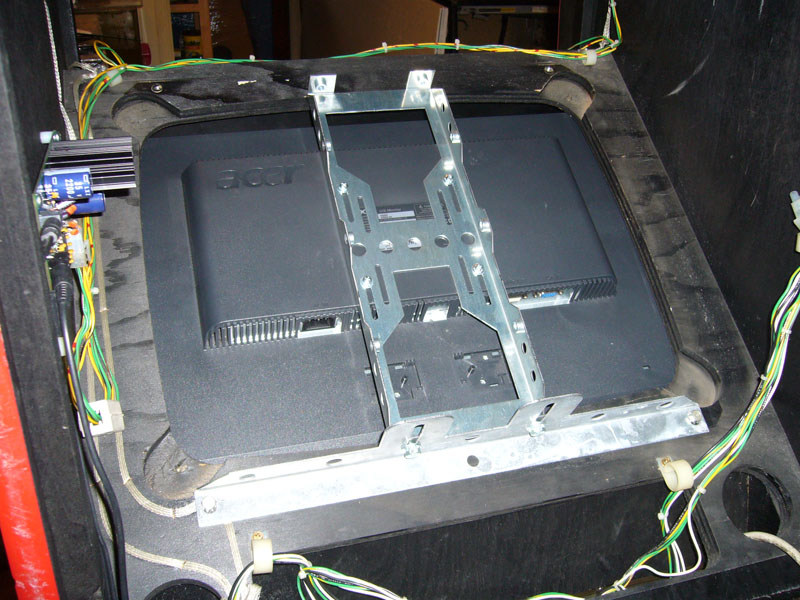
Attach the upper support bracket with the fluorescent light:
Attach the LCD carrier to the upper support bracket (Note: you'll need to adjust the LCD and the carrier frame around to get the LCD into the optimal position):
Here are some pictures of the LCD installed (note that the translight is properly illuminated):
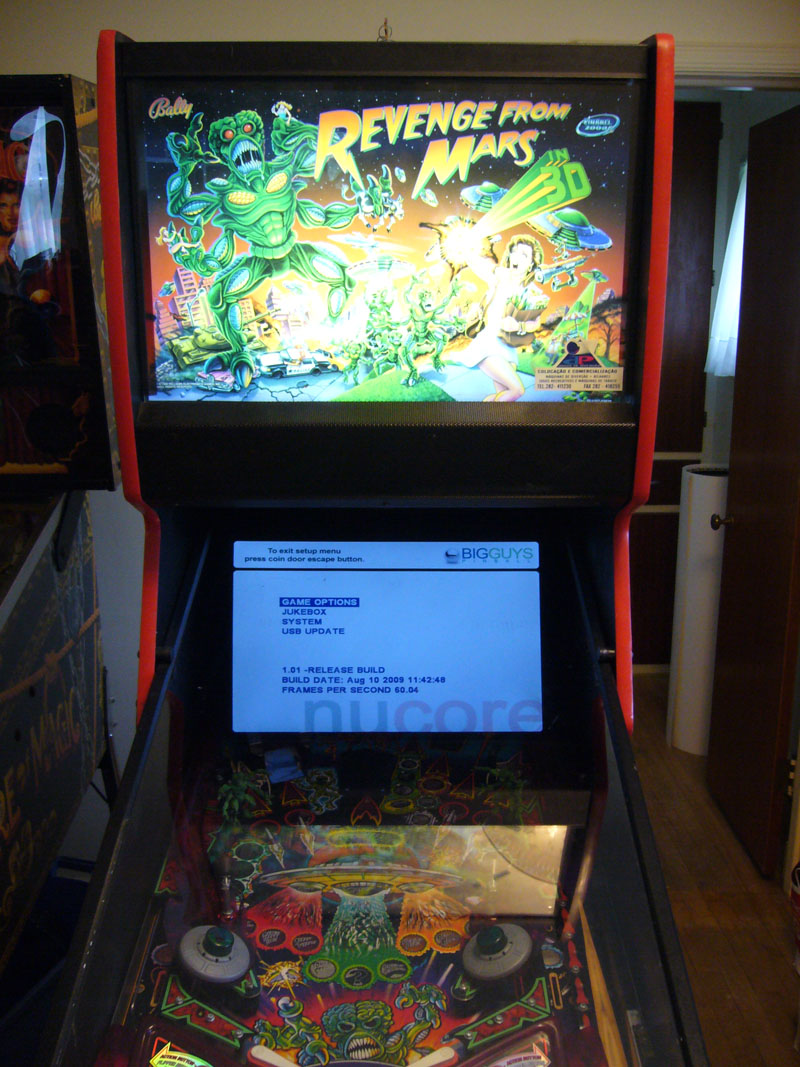
And one more:
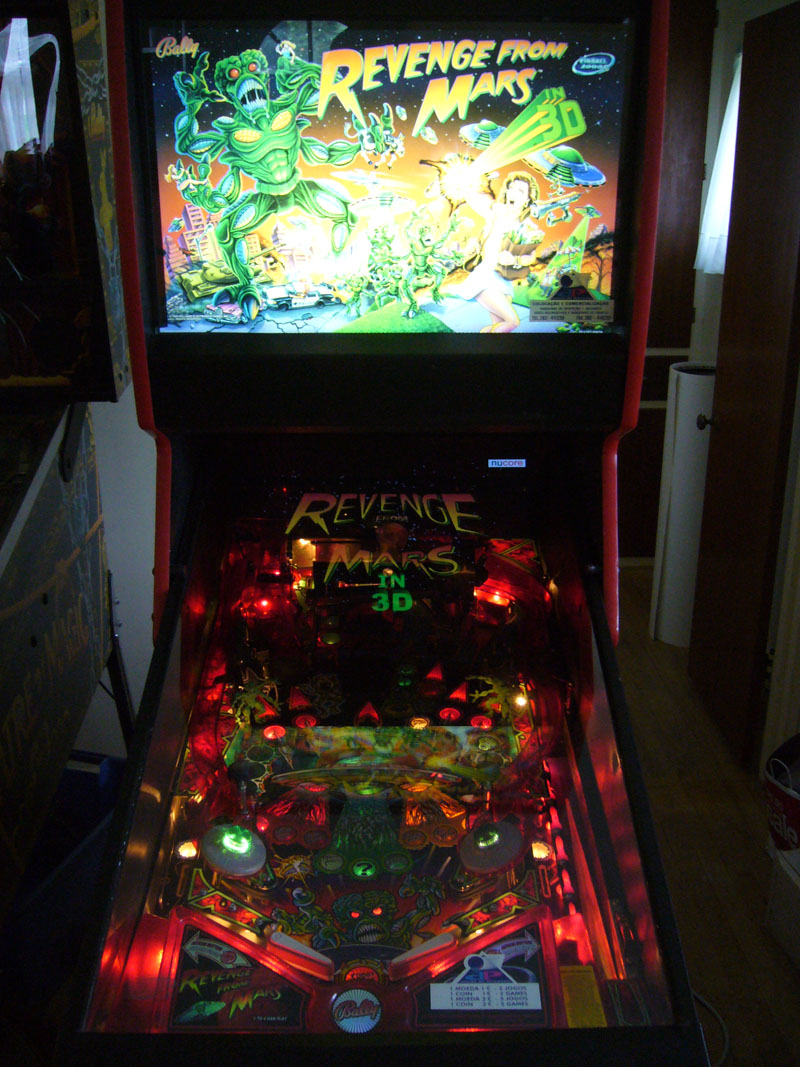
Tony
This is the completed frame (without the monitor):
The first step is to assemble the upper support bracket with the fluorescent light:
Attach the two light posts to the support bracket:
Attach the fluorescent light bar to the two posts:
Next attach the LCD carrier frame to the back of the LCD:
(note: You will need to remove the desktop stand (and optionally disable or black out any front panel status LEDs) from the LCD)
Note that the LCD is mounted all the way forward on the carrier.
Now attach the lower support bracket to the carrier:
Note that the carrier is mounted to the support bracket as low as possible.
Flip the LCD around so that the support bracket faces towards the head:
Pull the support bracket up into the head so that it's resting on the bottom edge of the monitor opening:
Pull the whole LCD up into the head and rest the top part of the carrier on the top edge of the opening and attach the lower support bracket to the head with two of the original monitor mounting screws:
Place the black paper strip under the carrier at the top and center it horizontally so that the paper covers any open gap at the top of the opening. You'll need to punch a couple of holes in the paper so you can feed the upper mounting screws through:
Attach the upper support bracket with the fluorescent light:
Attach the LCD carrier to the upper support bracket (Note: you'll need to adjust the LCD and the carrier frame around to get the LCD into the optimal position):
Here are some pictures of the LCD installed (note that the translight is properly illuminated):
And one more:
Tony
www.greatlakesmodular.com
Re-Engineered Pinball Parts!
Re-Engineered Pinball Parts!
Re: LCD Mounting Kit - Great Lakes Modular
When are you going to be making this available on your website. This is a must have!
Re: LCD Mounting Kit - Great Lakes Modular
You do not have to wait for it to show up on the GLM website. Simply send me an email and your zipcode/country etc. and I will be happy to send you a shipping quote and all of the necessary ordering information.
Tony
Tony
www.greatlakesmodular.com
Re-Engineered Pinball Parts!
Re-Engineered Pinball Parts!